There’s something very exciting when working directly with hardware as a professional dotnet software developer that has spent over a decade developing for desktop, mobile, and web. It feels great being able to put my code on a small, low-powered, resource-constrained Microcontroller and have it solve a specific problem I have… or just do fun little projects. After all, it’s why I got into programming in the first place.
This blog post is to document how this project came to be and what I had to do to get to the finish line.
What
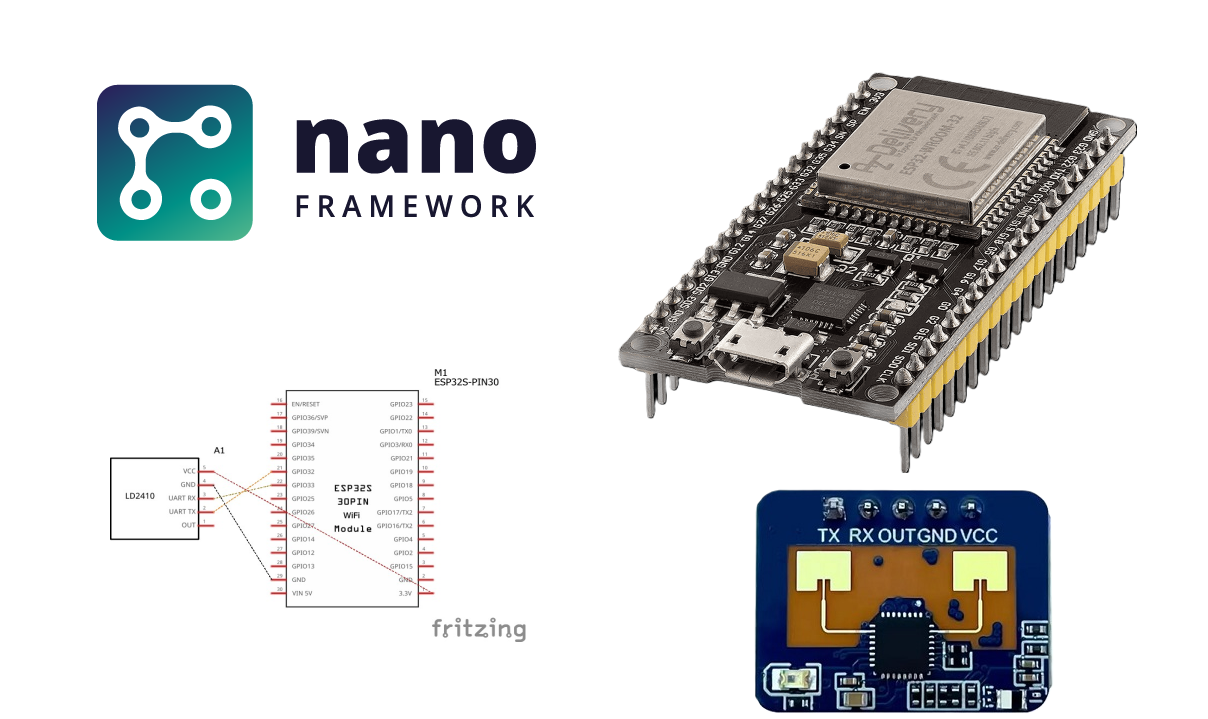
Some time last year, I came across an interesting “presence sensor”. The LD2410 is 24Ghz human presence sensor with a great feature set and allows customization of many aspects of its functionality. It can detect if a human target is moving or resting, how far they are, and the “energy” of their movement. It can also report if there are no human targets within its detection range after a certain amount of time has passed.
I got very interested in this radar and immediately bought a couple modules. They are very cheap and go for as low as $5 including a breakout board.
I wanted to build something with this radar and settled on an idea I think I saw somewhere on the internet: Automatically lock a PC if the user is not there.
The Plan
What I needed was:
- An MCU: I have plenty ESP32 I can use for this.
- Embedded systems programming language: C# with nanoFramework.
- The radar module: LD2410.
- A way to lock the PC…???? 🤔
The Journey
The LD2410 exposes a UART interface. It has its own, but well documented, protocol which can be used to read real-time data and to configure the radar settings. It also has an extra pin that goes high when a huamn target is within range, and low when there is no one.
The ‘B’ variant (LD2410B) has bluetooth support. The official mobile app can connect to the radar and provide real-time data and configuration options.
This made the LD2410 very easy to integrate with. I mentioned earlier that I want to use nanoFramework and C# for this project. I had a look around and could not find a pre-made library for the LD2410 radar in C#. This did not deter me. I decided to write a device binding for LD2410 in C# and contribute the library to the nanoFramework project. Since there is already support for UART in nanoFramework, my task here was easy: implement the LD2410 UART protocol in an easy-to-use library with a straightforward API surface.
But what about actually locking the PC when the user steps away? How can I lock the PC using an ESP32 MCU?
There were, realistically, 2 options:
- The MCU talks to a piece of software on the computer which listens for a specific signal. When the signal is received, the software on the PC would call an internal Windows API to trigger the lock screen.
- The MCU acts as a keyboard and simply “presses” Win+L key combination.
Obviously, option 2 is the way to go here. No need for a middleman piece of software to be involved at all. It would only serve as an additional point of failure.
Integrating the LD2410 Radar
As mentioned earlier, the LD2410 has a well-documented UART interface. I began working on a library for it almost immidiately with focus on making sure the APIs exposed by the library follow the C#-style and a radar can be integrated with a few lines of code.
The result looks something like this:
var radar = new Radar("COM3");
radar.Connect();

// create an event handler to listen to incoming real-time data
radar.OnMeasurementReceived += OnRadarMeasurementReceived;

// do something with the data
// more on this next
That’s it! That’s everything needed to start using the radar. There are more APIs in the library that cover configurations, factory reset, and engineering mode. But, to get started, the above is all that’s required.
The library is open source and under the nanoFramework Github Organization. Repository can be found here with more information and sample code.
Now that I had the measurements coming in from the radar in real time, it was time to do something with them. More specifically, lock the PC when the radar indicates that there is no one in its vicinity.
ESP32 MCU as a Keyboard
The ESP32 MCU must be connected to the PC to act as a keyboard. Generally, this is achievable by either using a USB cable or a Bluetooth Low Energy connection.
At the time I was investigating this, I did not know much about how computers and keyboards communicated. After doing some research, I learned of a protocol called Human Interface Device Protocol/Specification, or HID. It originated in the USB Specification to act as a unified spec that various human input devices can use without requiring custom drivers. It supports devices such as keyboards, Mice, and Game Controllers. It can also support other types of devices like Uninterruptable Power Supplies.
A keyboard, for example, will need to declare its capabilities using something called “Reports”. These reports are used to describe the device and how it will communicate with a host machine.
Keyboards that connect to a PC via Bluetooth actually make use of this HID specification. The Bluetooth Special Interest Group made the decision to adapt the USB HID spec to BLE so it is easier for device manufacturers to support BLE.
Armed with this knowledge, I went to the nanoFramework Discord server with some questions about USB HID support. In short, the answer I got was that USB support is still somewhat quiet limited and USB HID is not supported. However, work was being done on the USB implementation by members of the core team.
It was unknown when this work would be completed and USB HID would’ve had to be developed afterwards. I did not want to wait otherwise my interest in this project would fizzle and I end up moving on.
I knew that Bluetooth and Bluetooth Low Energy (BLE) was well supported in nanoFramework on the ESP32. nanoFramework also did not have support for HID on BLE. But hey, nF is open source and so I decided to jump into this and help bring BLE HID to nF and fill this gap.
I won’t get into details of how exactly all of this HID stuff work in this blog post. I will leave some links to resources I used during this project and I might do a future post if I think there’s something I could add.
It took a good amount of time to fully grasp how HID works in general, and how it works in BLE specifically. On top of that, I wanted to design the library in such way that support for future HID devices can be added easily.
The current version of the library has support for Keyboard and Mouse and they serve as a starting point for future device implementations. It is publically available for any nanoFramework project that needs to emulate a HID device.
The code is straightforward to use. The methods available emulate real-world usage of a keyboard/mouse. The following is a sample of how to setup a BLE keyboard, advertise it, and then send some keystrokes to the host device:
// instantiate a keyboard class instance
var kbd = new Keyboard(deviceName: "nF BLE Keyboard",
    deviceInfo: new DeviceInformation("nF", "BLEKBD1", "1", "01", "01", "01"),
    protocolMode: ProtocolMode.Report,
    plugAndPlayElements: new PnpElements(sig: 0x02, vid: 0xE502, pid: 0xA111, version: 0x210));

// next, initialize and begin advertising it over BLE
kbd.Initialize();
kbd.Advertise();

// listen to the Connected event to know when the keyboard is connected to a PC and start sending keystrokes.
kbd.Connected += (sender, e) =>
{
    // open task manager on a Windows PC
    kbd.Press(Keys.Modifiers.LeftCtrl);
    kbd.Press(Keys.Modifiers.LeftShift);
    kbd.Press(Keys.Control.Escape);

    kbd.ReleaseAll();
}
With the HID library done and ready. It was time to finally write the code for the PC lock.
Putting all together
With the libraries made and published, it was time to finally put it all together. I had the building blocks ready.
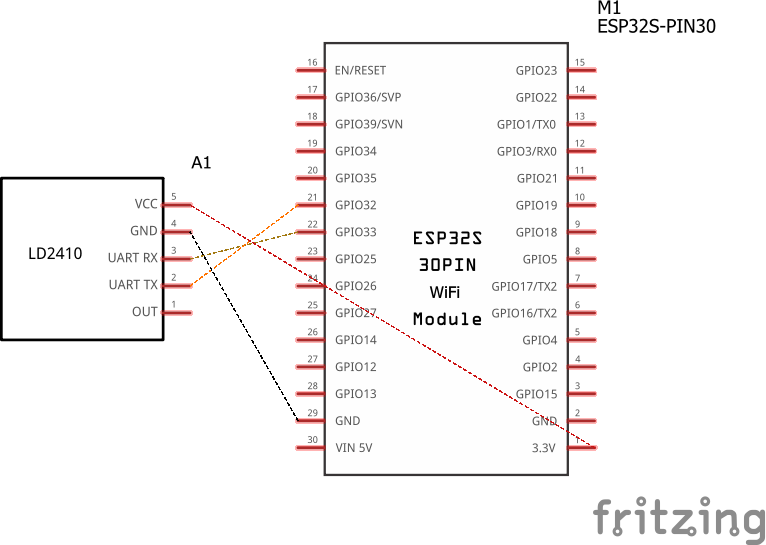
Schematics
Let’s start with the schematics for this. It is actually quite simple. ESP32 MCU connected to the LDF2410B Radar:
Code
I installed the following nuget packages in addition to the ones installed in the default nanoFramework blank project:
nanoFramework.Hardware.Esp32
nanoFramework.System.Device.Gpio
nanoFramework.System.IO.Ports

// ... and the libraries I contributed
nanoFramework.Iot.Device.Ld2410
nanoFramework.Bluetooth.Hid
The code isn’t too long. A bit of it is just some debugging helpers but the rest is straightforward: Setup the radar and keyboard, monitor measurements from the radar, and if the radar reports no one is there then lock the PC using the keyboard class:
using System;
using System.Device.Gpio;
using System.IO.Ports;
using System.Threading;

using Iot.Device.Ld2410;
using Iot.Device.Ld2410.Reporting;

using nanoFramework.Bluetooth.Hid;
using nanoFramework.Bluetooth.Hid.Devices;
using nanoFramework.Hardware.Esp32;

namespace App
{
	public static class Program
	{
		private static SerialPort debugSerialPort;
		private static GpioController gpioController;
		private static GpioPin ledPin;
		private static Radar radar;
		private static Keyboard keyboard;
		private static AutoResetEvent resetEvent;
		private static Thread ledThread;

		public static void Main()
		{
			try
			{
				resetEvent = new AutoResetEvent(false);

				ConfigureGpio();
				ConfigureIndicatorLed();
				FlashLed();
				ConfigureDebugSerial();

				LogInfo("Device starting up...");

				ConfigurePresenceRadar();
				ConfigureKeyboardInterface();

				KillLedFlash();

				for (; ; )
				{
					LedOn();

					radar.OnMeasurementReceived += OnRadarMeasurementReceived;
					resetEvent.WaitOne();
					radar.OnMeasurementReceived -= OnRadarMeasurementReceived;

					LedOff();

					LogInfo("Radar cycle completed. Sleeping until the next cycle.");
					SleepSeconds(2);
				}
			}
			catch (Exception ex)
			{
				KillLedFlash();
				LedOn();

				LogError($"Device main loop crashed. Error: {ex.Message} {ex.StackTrace}");
			}
		}

		private static void OnRadarMeasurementReceived(object sender, ReportFrame report)
		{
			if (!keyboard.IsConnected)
			{
				LogInfo("Keyboard interface is not connected to a host. Radar event will be ignored.");

				resetEvent.Set();
				return;
			}

			if (report.DataType == ReportingType.BasicMode)
			{
				var basicReport = (BasicReportFrame)report;
				if (basicReport.TargetState == TargetState.NoTarget)
				{
					keyboard.Send(Keys.Modifiers.LeftGUI, Keys.Alphabet.L);
					LogInfo("No presence detected. Sent lock command via Keyboard interface.");
				}

				resetEvent.Set();
			}
		}


		private static void ConfigureDebugSerial()
		{
			Configuration.SetPinFunction(25, DeviceFunction.COM2_RX);
			Configuration.SetPinFunction(27, DeviceFunction.COM2_TX);

			debugSerialPort = new SerialPort(
				portName: "COM2",
				baudRate: 256_000,
				parity: Parity.None,
				dataBits: 8,
				stopBits: StopBits.One);

			debugSerialPort.Open();

			LogInfo("Debug Serial Port ready.");
		}

		private static void ConfigureGpio()
		{
			gpioController = new GpioController();
		}

		private static void ConfigureIndicatorLed()
		{
			ledPin = gpioController.OpenPin(22, PinMode.Output);

			ledThread = new(() =>
			{
				for (; ; )
				{
					LedOn();
					Sleep(TimeSpan.FromMilliseconds(250));

					LedOff();
					Sleep(TimeSpan.FromMilliseconds(250));
				}
			});
		}

		private static void ConfigurePresenceRadar()
		{
			LogInfo("Configuring LD2410B radar...");

			Configuration.SetPinFunction(32, DeviceFunction.COM3_RX);
			Configuration.SetPinFunction(33, DeviceFunction.COM3_TX);

			radar = new Radar("COM3");

			LogInfo("Connecting to radar...");

			radar.Connect();

			LogInfo($"Radar fw ver: {radar.FirmwareVersion}");

			LogInfo("Reseting radar before sending new configurations...");

			radar.EnterConfigurationMode();
			radar.RestoreFactorySettings(restartOnCompletion: true);
			SleepSeconds(5);

			LogInfo("Radar is back online.");

			radar.EnterConfigurationMode();
			radar.ReadConfigurations();

			LogInfo("Refreshed radar configuration. Pushing new configuration...");

			if (!radar.ConfigurationModeEnabled)
			{
				LogError("Could not enter radar config mode after restart!");
				throw new Exception("Radar config mode disabled.");
			}

			radar.SetMaxDistanceGateAndUnmannedDuration(
				maximumMovementDistanceGate: 2,
				maximumRestingDistanceGate: 2,
				noOneDuration: TimeSpan.FromSeconds(5)
				);

			radar.ExitConfigurationMode();

			if (radar.FirmwareVersion == null)
				throw new Exception("Radar failed to initialize.");

			LogInfo("Radar configuration complete.");
			LogInfo("Radar ready!");
		}

		private static void ConfigureKeyboardInterface()
		{
			keyboard = new Keyboard(
				deviceName: "PC User Sensor [ALPHA]",
				new DeviceInformation(
					manufacturer: "MrCSharp",
					modelNumber: "MK-1",
					serialNumber: "0001",
					hardwareRevision: "0001",
					firmwareRevision: "0001",
					softwareRevision: "0001"),
				protocolMode: ProtocolMode.Report,
				plugAndPlayElements: new PnpElements(sig: 0x02, vid: 0xE502, pid: 0xA111, version: 0x210));

			keyboard.Initialize();
			keyboard.Advertise();

			LogInfo("Keyboard interface ready and discoverable.");
		}


		private static void LedOn()
			=> ledPin.Write(PinValue.Low);

		private static void LedOff()
			=> ledPin.Write(PinValue.High);

		private static void FlashLed()
		{
			ledThread.Start();
		}

		private static void KillLedFlash()
		{
			ledThread.Suspend();
			LedOff();
		}

		private static void LogInfo(string msg)
		{
#if DEBUG
			if (!debugSerialPort.IsOpen)
				return;

			debugSerialPort.WriteLine($"DBG INFO: {msg}");
#endif
		}

		private static void LogError(string msg)
		{
			if (!debugSerialPort.IsOpen)
				return;

			debugSerialPort.WriteLine($"DBG ERR: {msg}");
		}

		private static void Sleep(TimeSpan duration)
			=> Thread.Sleep(duration);

		private static void SleepSeconds(uint seconds)
			=> Sleep(TimeSpan.FromSeconds(seconds));
	}
}
What’s Next?
This project was a lot of fun to work on. It took time to build the building blocks needed to build it 😅 but I learned a lot.
There’s room for future improvements. I am not 100% happy with the lock using Bluetooth to communicate with the PC. Such a device should work reliably and Bluetooth isn’t always reliable. And so to deal with this, I will be keeping an eye on USB support in nanoFramework and USB HID so I can use those instead. For now, this will do.
If you have read this far, thank you and make sure to checkout the nanoFramework project.
References
- Bluetooth HID: An Introduction to Human Interface Devices with BLE.
- HID over GATT Profile 1.0.
- HID Intro (Linux Kernel).
- Device Information Service Specification.
- Device Class Definition for Human Interface Devices (HID).
- HID Specification and Usage Tables.
Tools
- Serial Bluetooth Terminal (Android APP)
- nRF Connect for Mobile (Android APP)
- BLE Toolbox (Windows Program)
And finally, the nF Packages: